Characters
The core of every story are the characters. They make or break everything about a story. So what does Visual Novel Machinery offer in terms of characters?
First of all, characters need to be defined in the Character Definitions Data Table. Details about what is contained in a character definition can be found here. If the character is not added to that data table, it doesn’t exist for the plugin.
The are two ways characters can be used in the Visual Novel Machinery, visual and non-visual.
Non-visual means that we just have the name of the character in the dialog box. Nothing else is displayed for that character (Unless you are using CGs to display all moments of the story). You can also change the color of the character name displayed in the dialog box. It is the most basic form of using characters in Visual Novel Machinery. This type is already taken care of with the Dialog Text Node.
Visual means that the character themselves are displayed as images on screen or as 3D characters in a dialog scene. This also means that you can display the character in different emotional states.
Visual Novel Machinery supports displaying both 3D and 2D characters at the same time.
Basics (2D)
There are two different ways of displaying a character. The first one is to use the Character Show Node. With this node you can select the character and the emotion of the character. An alternative option is to use the Dialog Text Node. This is the short-hand version to save on a node. You can also specify an emotion directly in this node, which will also show the character in that emotional state. If the character is already visible, both nodes with transition the character to a new emotional state.
Once a character is done talking you will also want to hide that character again. For this purpose the Character Hide Node exists. This node will hide the character of the specified character id. This is especially useful when having multiple characters on screen, and one of them leaves.
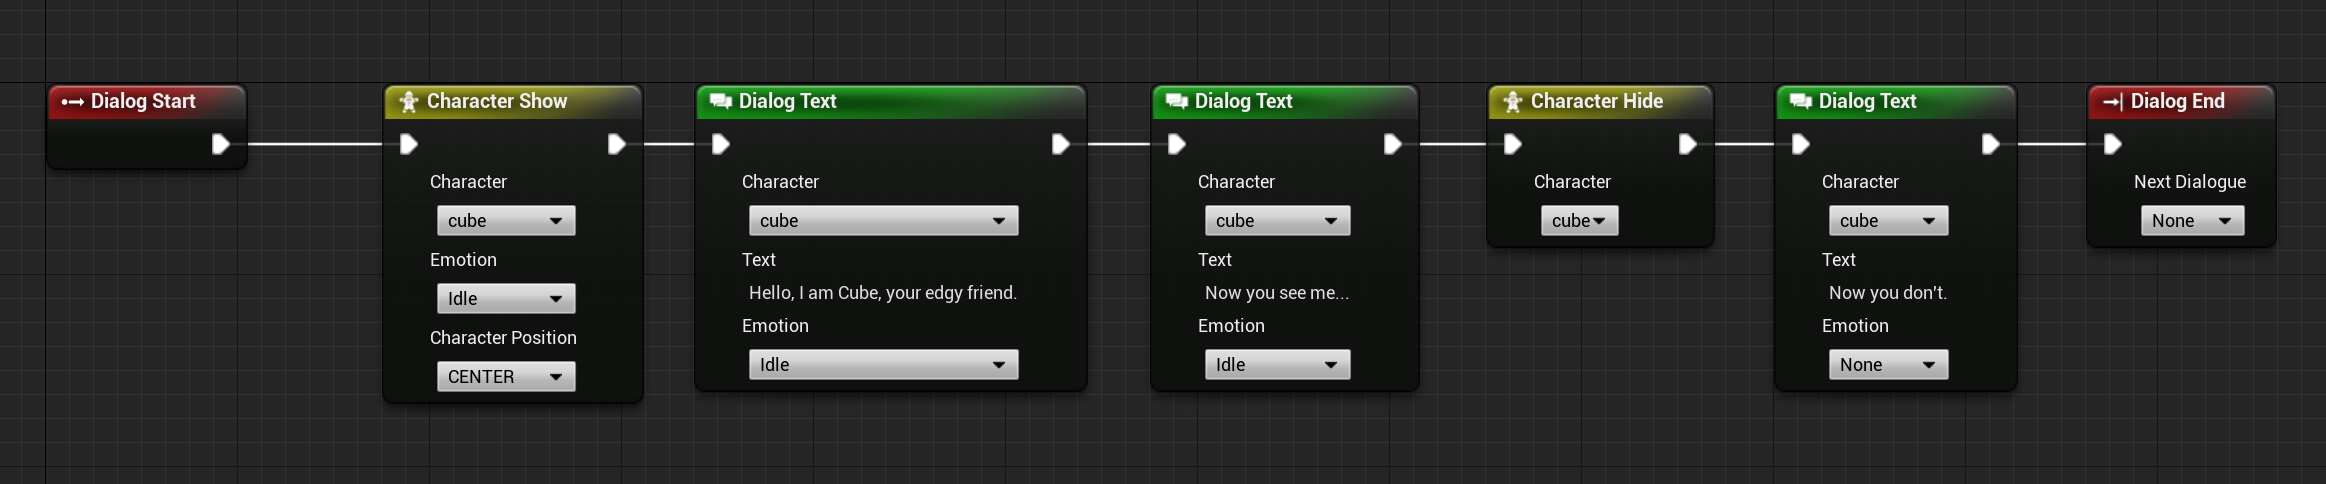
character.show -id=cube -emotion=Idle
dialog.text -character=cube -emotion=Idle "Hello, I am Cube, your edgy friend."
dialog.text -character=cube -emotion=Idle "Now you see me..."
character.hide -id=cube
dialog.text -character=cube -emotion=Idle "Now you don't."
dialog.end
On that note, how would one deal with multiple characters on screen? Per default they would all spawn in the center of the screen on top of each other. For this there are multiple options on moving the characters. The first option for newly displayed characters is to move them by specifying the position of the character in the Character Show Node or the Dialog Text Node. For characters that are already visible, it is also an option to use the Character Move Node. This one can move a character to the left/right/center/true-center.

character.show -id=cube -emotion=Idle -position=center
dialog.text -character=cube -emotion=Idle "Hello, I am Cube, your edgy friend."
dialog.text -character=cube -emotion=Idle "I am now in the center"
character.move -id=cube -position=left
dialog.text -character=cube -emotion=Idle "And now I am to the left."
character.hide -id=cube
dialog.text -character=cube -emotion=Idle "And now I am invisible."
dialog.end
Basics (3D) (Beta)
To display a 3D character use the Character 3D Show Node. With this node you can select the character, the emotion of the character and where you want to spawn the character. You have to make sure that you select the correct dialog scene, which is already visible at the moment the Character 3D Show Node is called. If the character is already visible, the character will switch to a new emotional state specified.
Once a character is done talking you will also want to hide that character again. For this purpose the Character 3D Hide Node exists. This node will hide the character of the specified character id.

dialog.text -character=cube -emotion=Idle "Let's enter our test scene!"
dialogscene.show -id=test_scene
dialogscene.switchcamera -id=test_scene camera=TestCamera
dialog.text -character=cube "Better. Now let's say \"Hello\" to Manny."
character3d.show -id=manny -emotion=Idle -dialogscene=test_scene -spawnlocation=TestLocation
dialog.text -character=manny "Hey Cube!"
dialogscene.switchcamera -id=test_scene camera=MannyCloseUp
dialog.text -character=manny "Gotta run."
character3d.hide -id=manny
dialogscene.switchcamera -id=test_scene camera=TestCamera
dialog.text -character=cube "Always in a rush."
dialog.text -character=manny "Oh well, let's go back."
dialog.end -nextdialog=start
Renaming characters
In some cases you want to allow the player to rename a character, for example the character they are playing for more immersion. In Visual Novel Machinery there are two ways to rename a character. Option one is to use the Character Rename Node. This node can be used to set the character to a specific name. Character Interactive Rename Node on the other hand allows the user to enter the new character name themselves.